Android Kernel Build and Debugging using QEMU
Steps on how to setup working Android Kernel Setup with debugging using QEMU.
Understanding the Android kernel is essential for anyone interested in security research, system programming, or operating system development. The kernel is the heart of Android, controlling hardware access, process management, and security boundaries. By compiling and emulating the kernel, researchers gain an environment to safely explore kernel internals, trace execution paths, and study the impact of vulnerabilities without risking a physical device.
Debugging capabilities further allow step-by-step inspection of kernel behavior, making it possible to reproduce and analyze real world vulnerabilities. This approach not only deepens understanding but also strengthens the ability to identify and mitigate potential weaknesses in production systems.
Overview
In this post, we will progressively build up the knowledge and tools required to study the Android kernel in depth. The steps are designed to move from basic setup to advanced debugging and driver development.
We will start by obtaining and compiling the Android Common Kernel (ACK), which forms the base for most Android devices. Next, we will create a minimal root filesystem using Buildroot, enabling us to run the kernel in an emulated environment. With this setup, we will emulate the Android kernel on QEMU, allowing safe experimentation without the need for physical hardware.
Once the environment is ready, we will dive into kernel driver programming, learning how drivers interact with the kernel and exploring typical vulnerabilities that can arise in such code. Finally, we will focus on kernel debugging, leveraging QEMU, GDB, and kernel logs to trace execution.
Obtain and Compile Android Common Kernel (ACK)
Firstly we need to download the Android Kernel Source and Compile it. The repository can be found here. From the various branches and tags you could download the latest code or select any version you want. To directly download the latest code, run -
1
2
wget https://android.googlesource.com/kernel/common/+archive/refs/heads/android-mainline.tar.gz
tar xf android-mainline.tar.gz
In my case I wanted the android12-5.10.149 kernel version for my purpose, so the tag I found was android12-5.10.149_r00. To clone this specific tag, we can run -
1
git clone --branch android12-5.10.149_r00 --single-branch https://android.googlesource.com/kernel/common
Once we have the repo on our system, we can go ahead and install the build dependencies -
1
2
3
4
5
6
7
8
9
10
11
sudo apt update
sudo apt install build-essential \
    gcc-aarch64-linux-gnu \
    binutils-aarch64-linux-gnu \
    libncurses-dev \
    bison flex \
    libssl-dev \
    bc \
    git \
    wget curl \
    dwarves
Once that is in place, we can go ahead and make the configuration file for our build -
1
ARCH=arm64 CROSS_COMPILE=aarch64-linux-gnu- make defconfig
A .config file will be created having the Kernel Build Configuration Flags. Make sure these key-values are present in the file -
1
2
3
4
5
6
7
CONFIG_DEBUG_INFO=y
CONFIG_DEBUG_FS=y
CONFIG_DEBUG_INFO_REDUCED=n
CONFIG_NET_9P=y
CONFIG_NET_9P_VIRTIO=y
CONFIG_CMDLINE="console=ttyAMA0"
CONFIG_GDB_SCRIPTS=y
If some entries are missing, add them in the .config file. After this, run the command -
1
ARCH=arm64 CROSS_COMPILE=aarch64-linux-gnu- make olddefconfig
This will revaluates all configs against the Kconfig dependencies. Now we are ready to build the Android Kernel. Run the final command -
1
ARCH=arm64 CROSS_COMPILE=aarch64-linux-gnu- make -j$(nproc)
At the beginning, it will ask you a series of questions regarding features to include. Just answer y to all and proceeed.
The build will take a few minutes. After completion, you will find the Kernel image saved as arch/arm64/boot/Image. We’ll be using this image later to run the Android Kernel using QEMU.
Create the File System
An initramfs (initial RAM filesystem) is a temporary root filesystem loaded into memory by the Linux kernel at boot time. It provides the minimal userspace environment required for early system initialization before the actual root filesystem is mounted.
The most common are distro-generated initramfs (such as those produced by dracut, initramfs-tools, or mkinitcpio), which are tailored for specific distributions and include modules for storage, networking, and drivers needed by that system. Another type is a custom minimal initramfs, often hand-crafted or generated with simple tools like busybox, used in embedded systems and kernel development, containing only the essentials for testing. A handcrafted busybox-based initramfs can work for simple testing but is tedious to maintain when extra libraries or debugging tools are needed.
Buildroot, which we will be using, automates the process of building a cross-compiled root filesystem with a wide selection of tools, libraries, and debugging support, making it highly suitable for QEMU-based kernel emulation.
Let’s go to the Downloads, and grab the latest version of Buildroot. We’ll then uncompress it and start the configuration.
1
2
3
4
wget https://buildroot.org/downloads/buildroot-2025.05.1.tar.gz
tar xf buildroot-2025.05.1.tar.gz
cd buildroot-2025.05.1
make menuconfig
You’ll be greeted by this menu screen below.
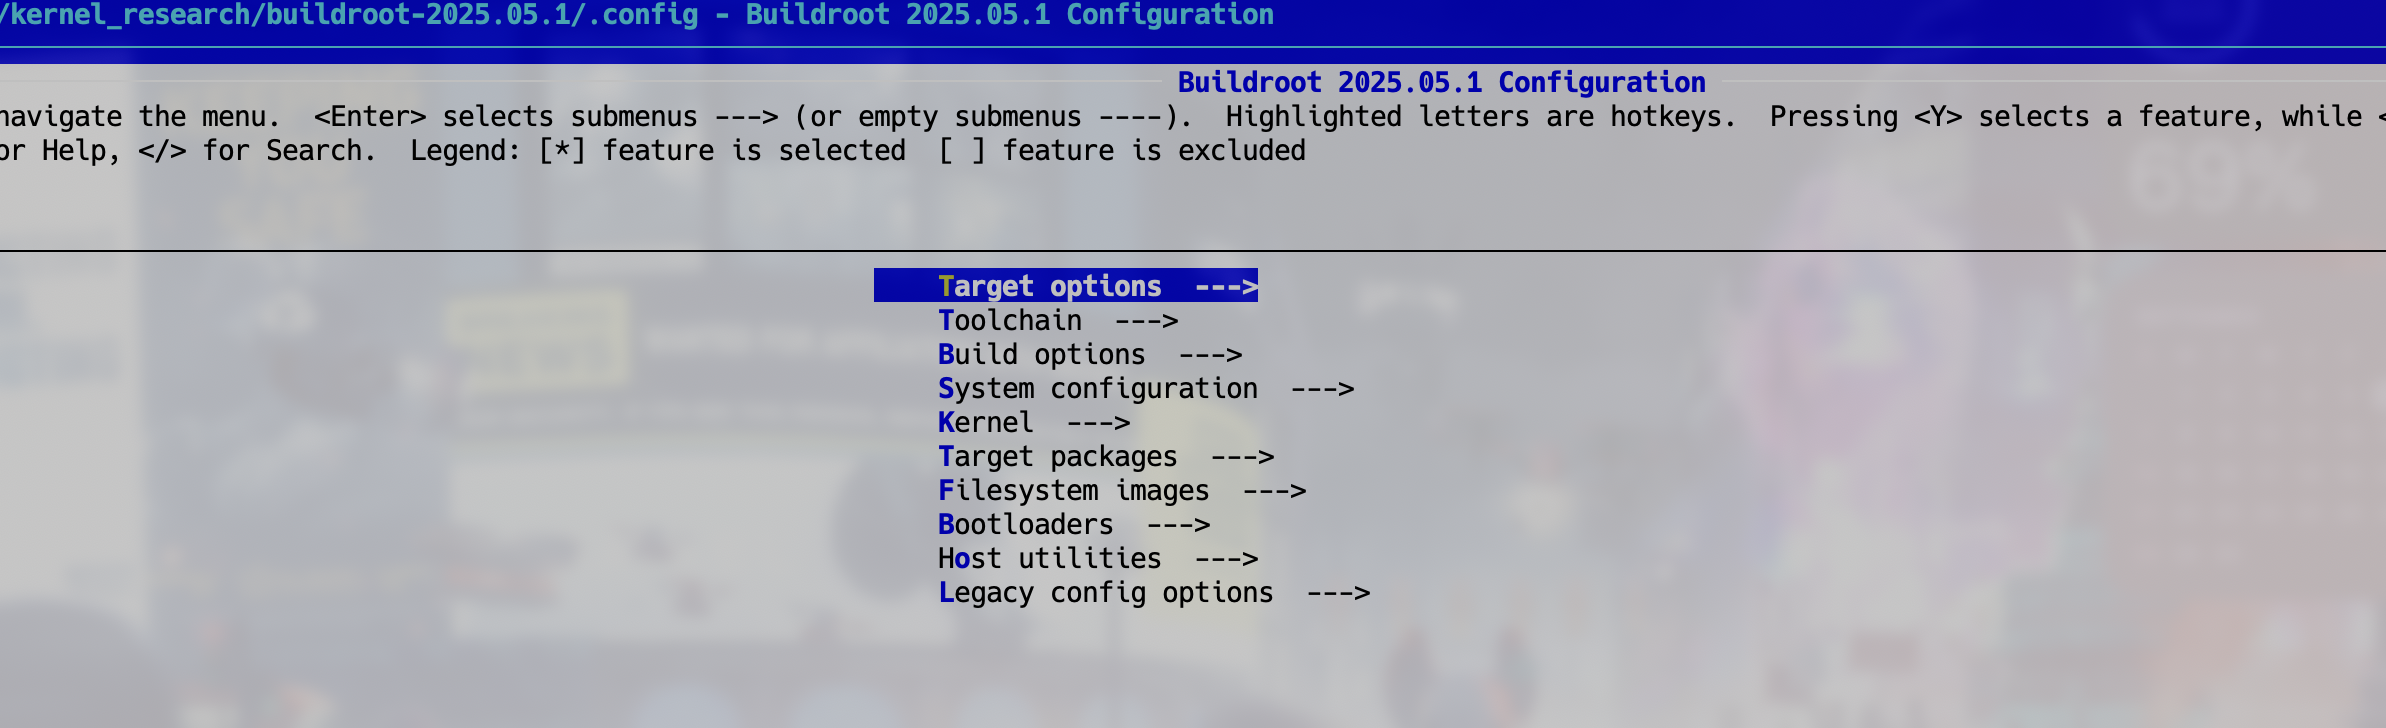
We’ll be making some changes to the configurations here.
Set Architecture Type
Set the Target Architecture to AArch64 (little endian) and the Target Architecture Variant to cortex-A53. You can fin this setting in the Target options menu.

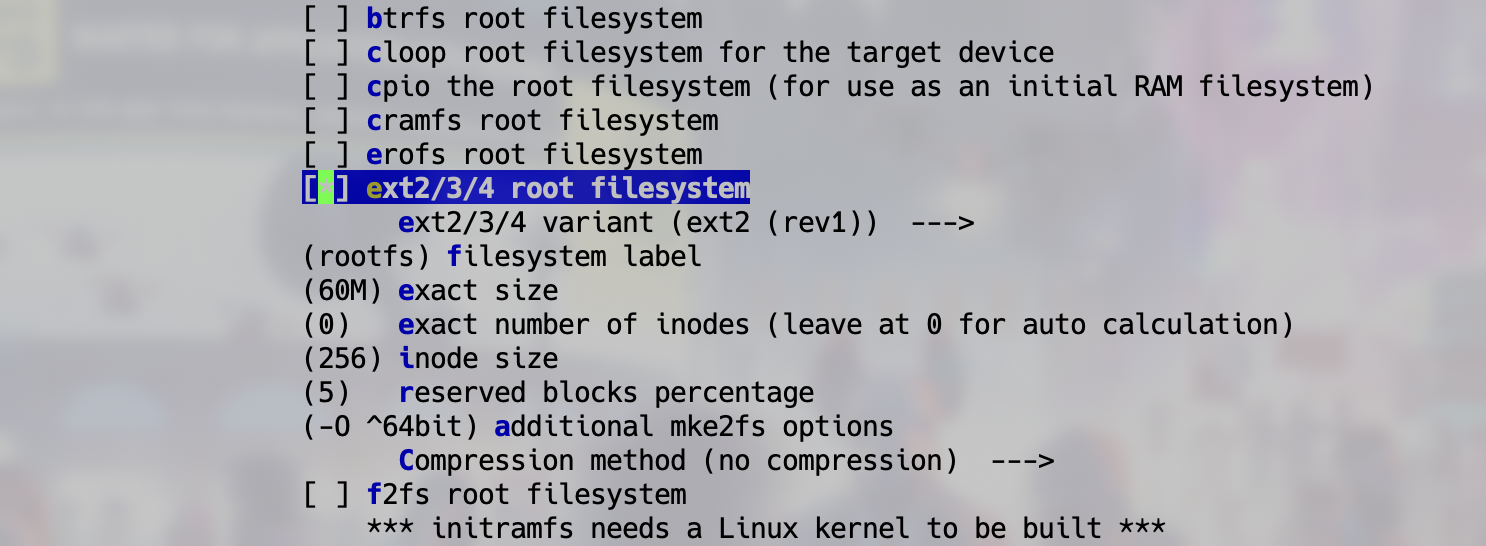
Set FileSystem Type
Set ext2/3/4 root filesystem in the Filesystem Images option.
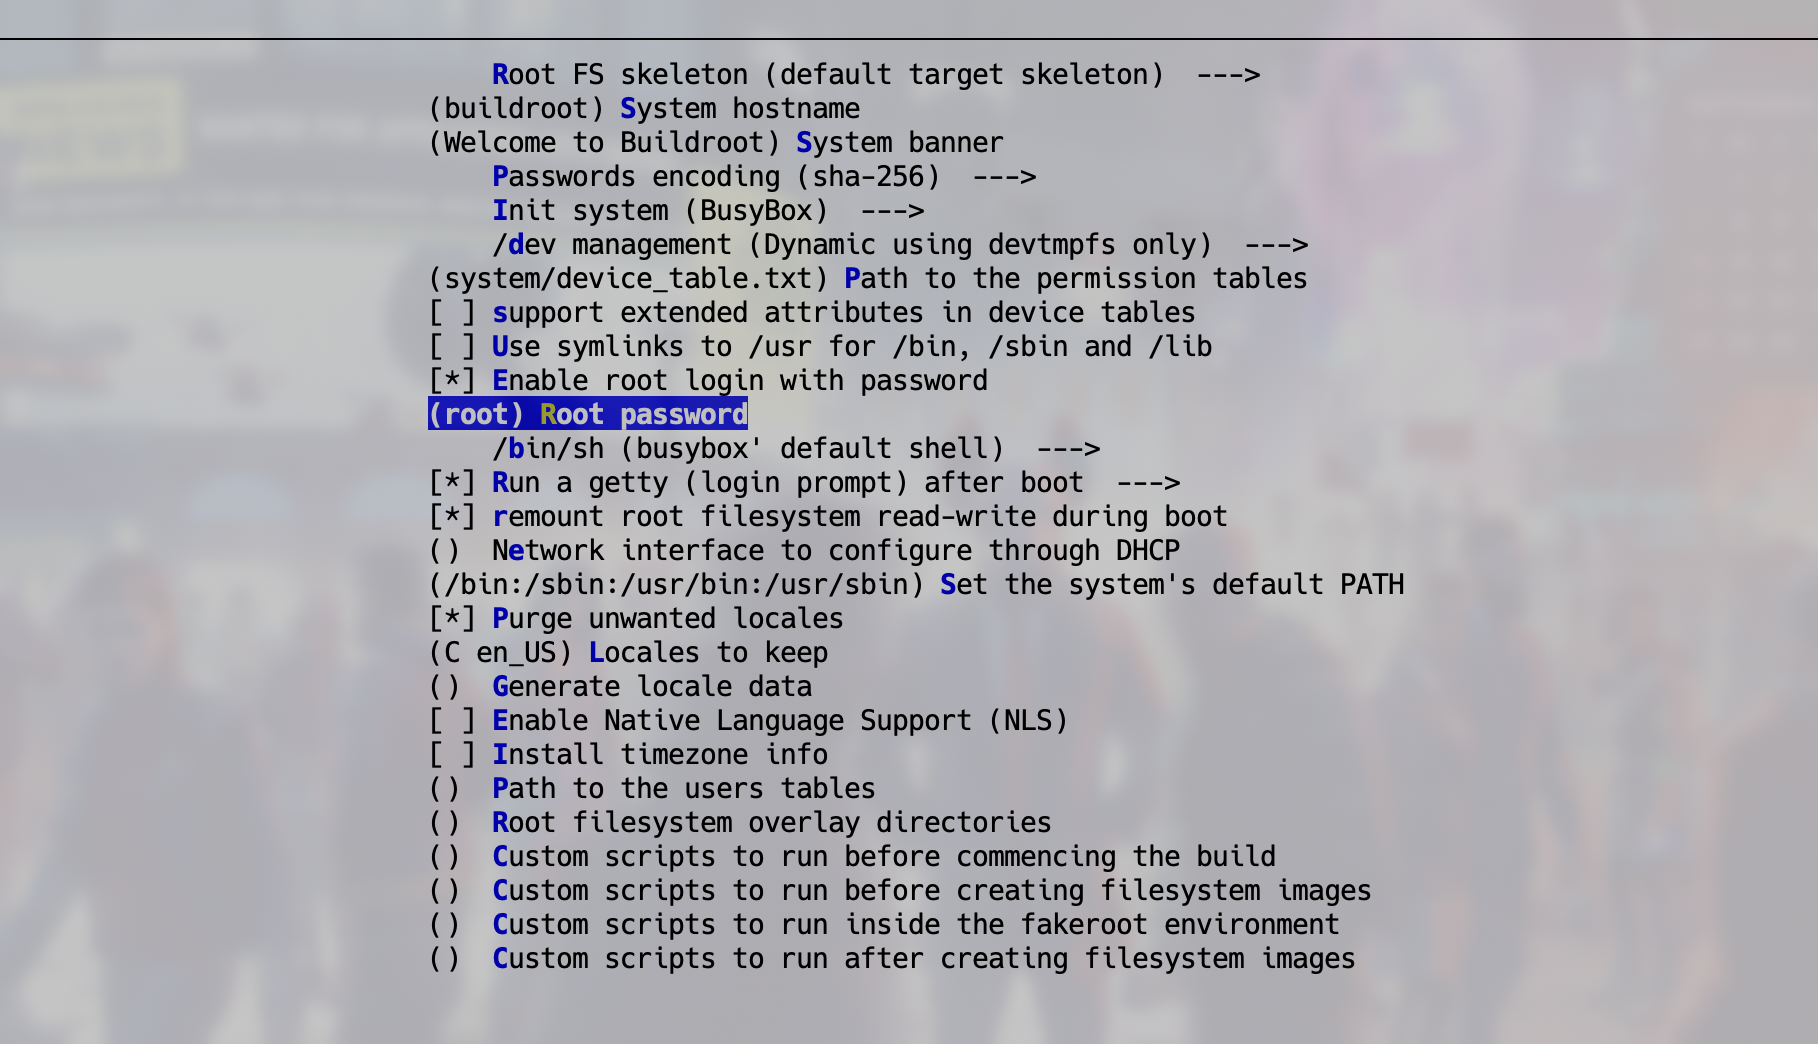
Set Password
Set root pasword of your choice through System configuration option.
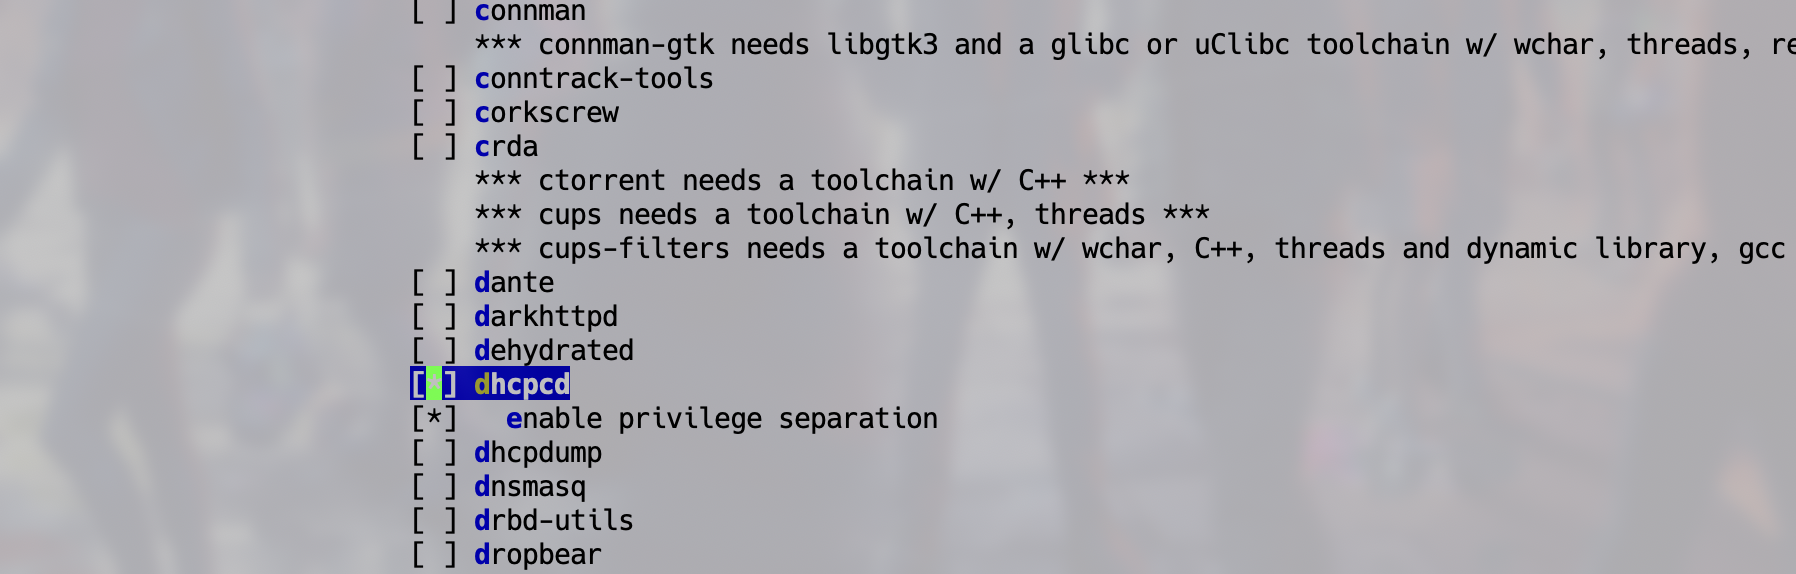
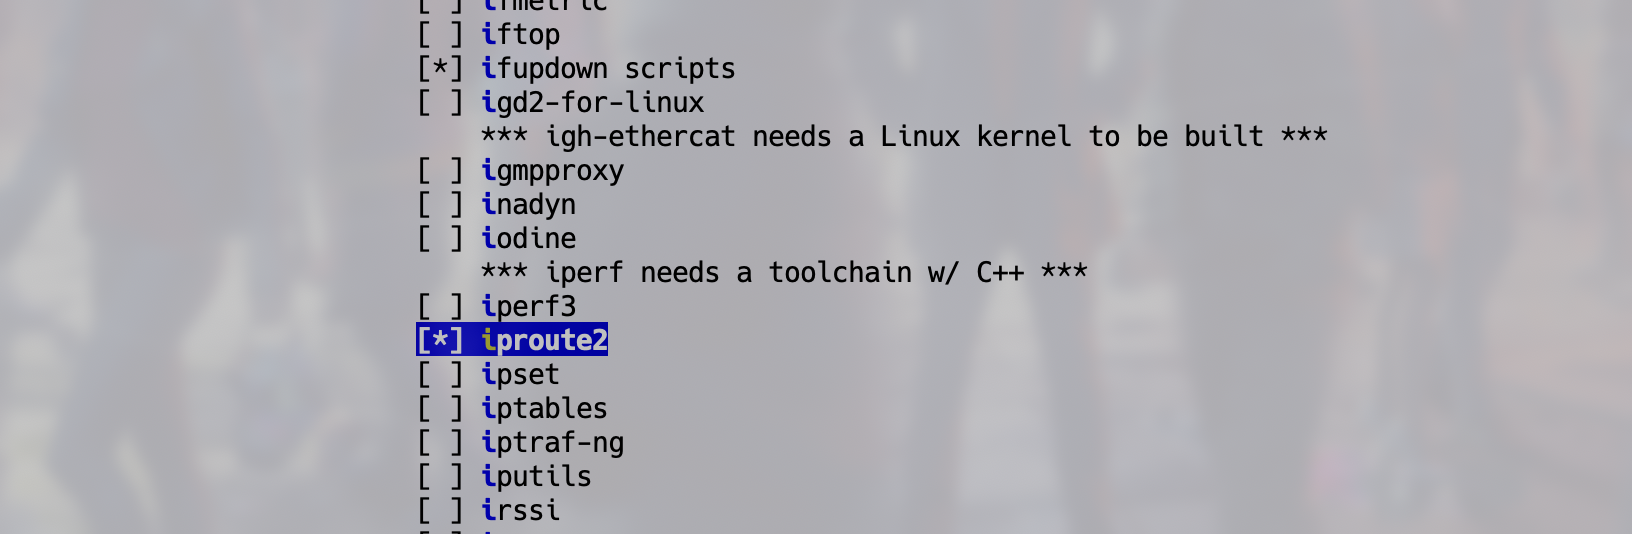
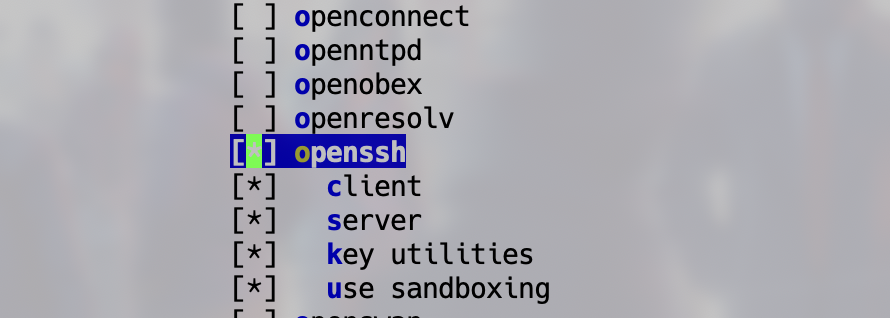
Set Networking Applications
Set the options dhcpd, ipcroute and openssh from Networking applications menu though the Target packages main menu.
After completing the above, choose Save in the menu below, which will save the configurations to .config file, after which you can choose Exit. Now, we are ready to build the filesystem. In the same directory, run -
1
make
This command will take a few minutes to run, after which you’ll find two files - rootfs.ext2 and rootfs.tar in the output/images folder.
Emulate the Android Kernel using QEMU
Now, that we have these two pieces together, we can now finally go ahead and run the Android Kernel using QEMU. Firstly we need to install the qemu-system-aarch64 binary.
1
2
sudo apt update
sudo apt install qemu-system-arm
Then go to the parent directory where your android-kernel (in my case common_5.10.149) and buildroot-2025.05.1 folder is present. We’ll be using the following run.sh file -
1
2
3
4
5
6
7
8
9
10
11
12
13
14
15
16
17
18
19
20
21
22
23
24
25
26
27
28
29
30
31
32
33
34
35
36
37
38
39
40
41
42
43
44
45
46
47
48
49
50
51
52
53
54
55
56
57
58
#!/bin/bash
set -euo pipefail

QEMU="qemu-system-aarch64"
KERNEL="repos/common_5.10.149"
ROOTFS="buildroot-2025.05.1/output/images/rootfs.ext2"

# sanity checks
if [ ! -f "$KERNEL/arch/arm64/boot/Image" ]; then
  echo "ERROR: kernel not found: $KERNEL/arch/arm64/boot/Image" >&2
  exit 1
fi
if [ ! -f "$ROOTFS" ]; then
  echo "ERROR: rootfs not found: $ROOTFS" >&2
  exit 1
fi

# Build QEMU args one-by-one using an array
ARGS=()

# Core machine setup
ARGS+=("-cpu" "cortex-a53")
ARGS+=("-machine" "virt")
ARGS+=("-nographic")
ARGS+=("-smp" "1")
ARGS+=("-m" "2048")

# Kernel & rootfs
ARGS+=("-kernel" "$KERNEL/arch/arm64/boot/Image")
ARGS+=("-drive" "file=$ROOTFS,format=raw,if=virtio")

# Networking (user mode + SSH forward)
ARGS+=("-netdev" "user,id=net0,hostfwd=tcp::13337-:22")
ARGS+=("-device" "virtio-net-device,netdev=net0")

# Kernel command line
ARGS+=("-append" "console=ttyAMA0 root=/dev/vda")

# Optional debug/freeze flags
for opt in "$@"; do
  case "$opt" in
    debug)
      ARGS+=("-s")   # wait for gdb connection on localhost:1234
      ;;
    freeze)
      ARGS+=("-S")   # start paused
      ;;
    *)
      echo "Warning: unknown option '$opt' (supported: debug, freeze)" >&2
      ;;
  esac
done

# Show full command for debugging
echo "Running: $QEMU ${ARGS[*]}"

# Run QEMU
exec "$QEMU" "${ARGS[@]}"
This is a standard script to run QEMU with some additional tweaks. The -append option passes kernel boot parameters (a boot-time command line) directly to the Linux kernel inside QEMU. It is equivalent to the kernel command line you’d see in /proc/cmdline after boot.
The console=ttyAMA0 tells the kernel to use the ttyAMA0 UART device as its primary console. On ARM systems, it is the first PL011 UART (commonly emulated in QEMU’s virt machine). This ensures that all kernel messages and login prompts appear in QEMU’s terminal window, so we can interact with the guest OS. The root=/dev/vda means the kernel will look for the root filesystem on the first virtio-blk device (usually provided by QEMU if we pass -drive if=virtio,…).
There are two parameters which are -s and -S. The -s is a shorthand for -gdb tcp::1234. It tells QEMU to start a GDB server on TCP port 1234. Useful for kernel or low-level debugging, since we can set breakpoints, inspect registers, or step through instructions. The -S makes QEMU freeze the CPU at startup, before executing the first instruction. We’ll be using these features in the Debugging Section.
The lines -netdev user,id=net0,hostfwd=tcp::13337-:22 Creates a user-mode network backend named net0, and forwards host TCP port 13337 → guest port 22, so we can SSH into the guest. This is useful for Buildroot or Linux guests where we want network access without setting up TAP bridges. The line -device virtio-net-device,netdev=net0 attaches a virtual network card (virtio-net-device) to the guest, connects it to the previously defined backend net0 giving the guest network access and enables the host port-forwarding rule. Together, they set up networking inside QEMU with SSH access from the host.
Run the command ./run.sh and you’ll be seeing Logs as it boots the Kernel.
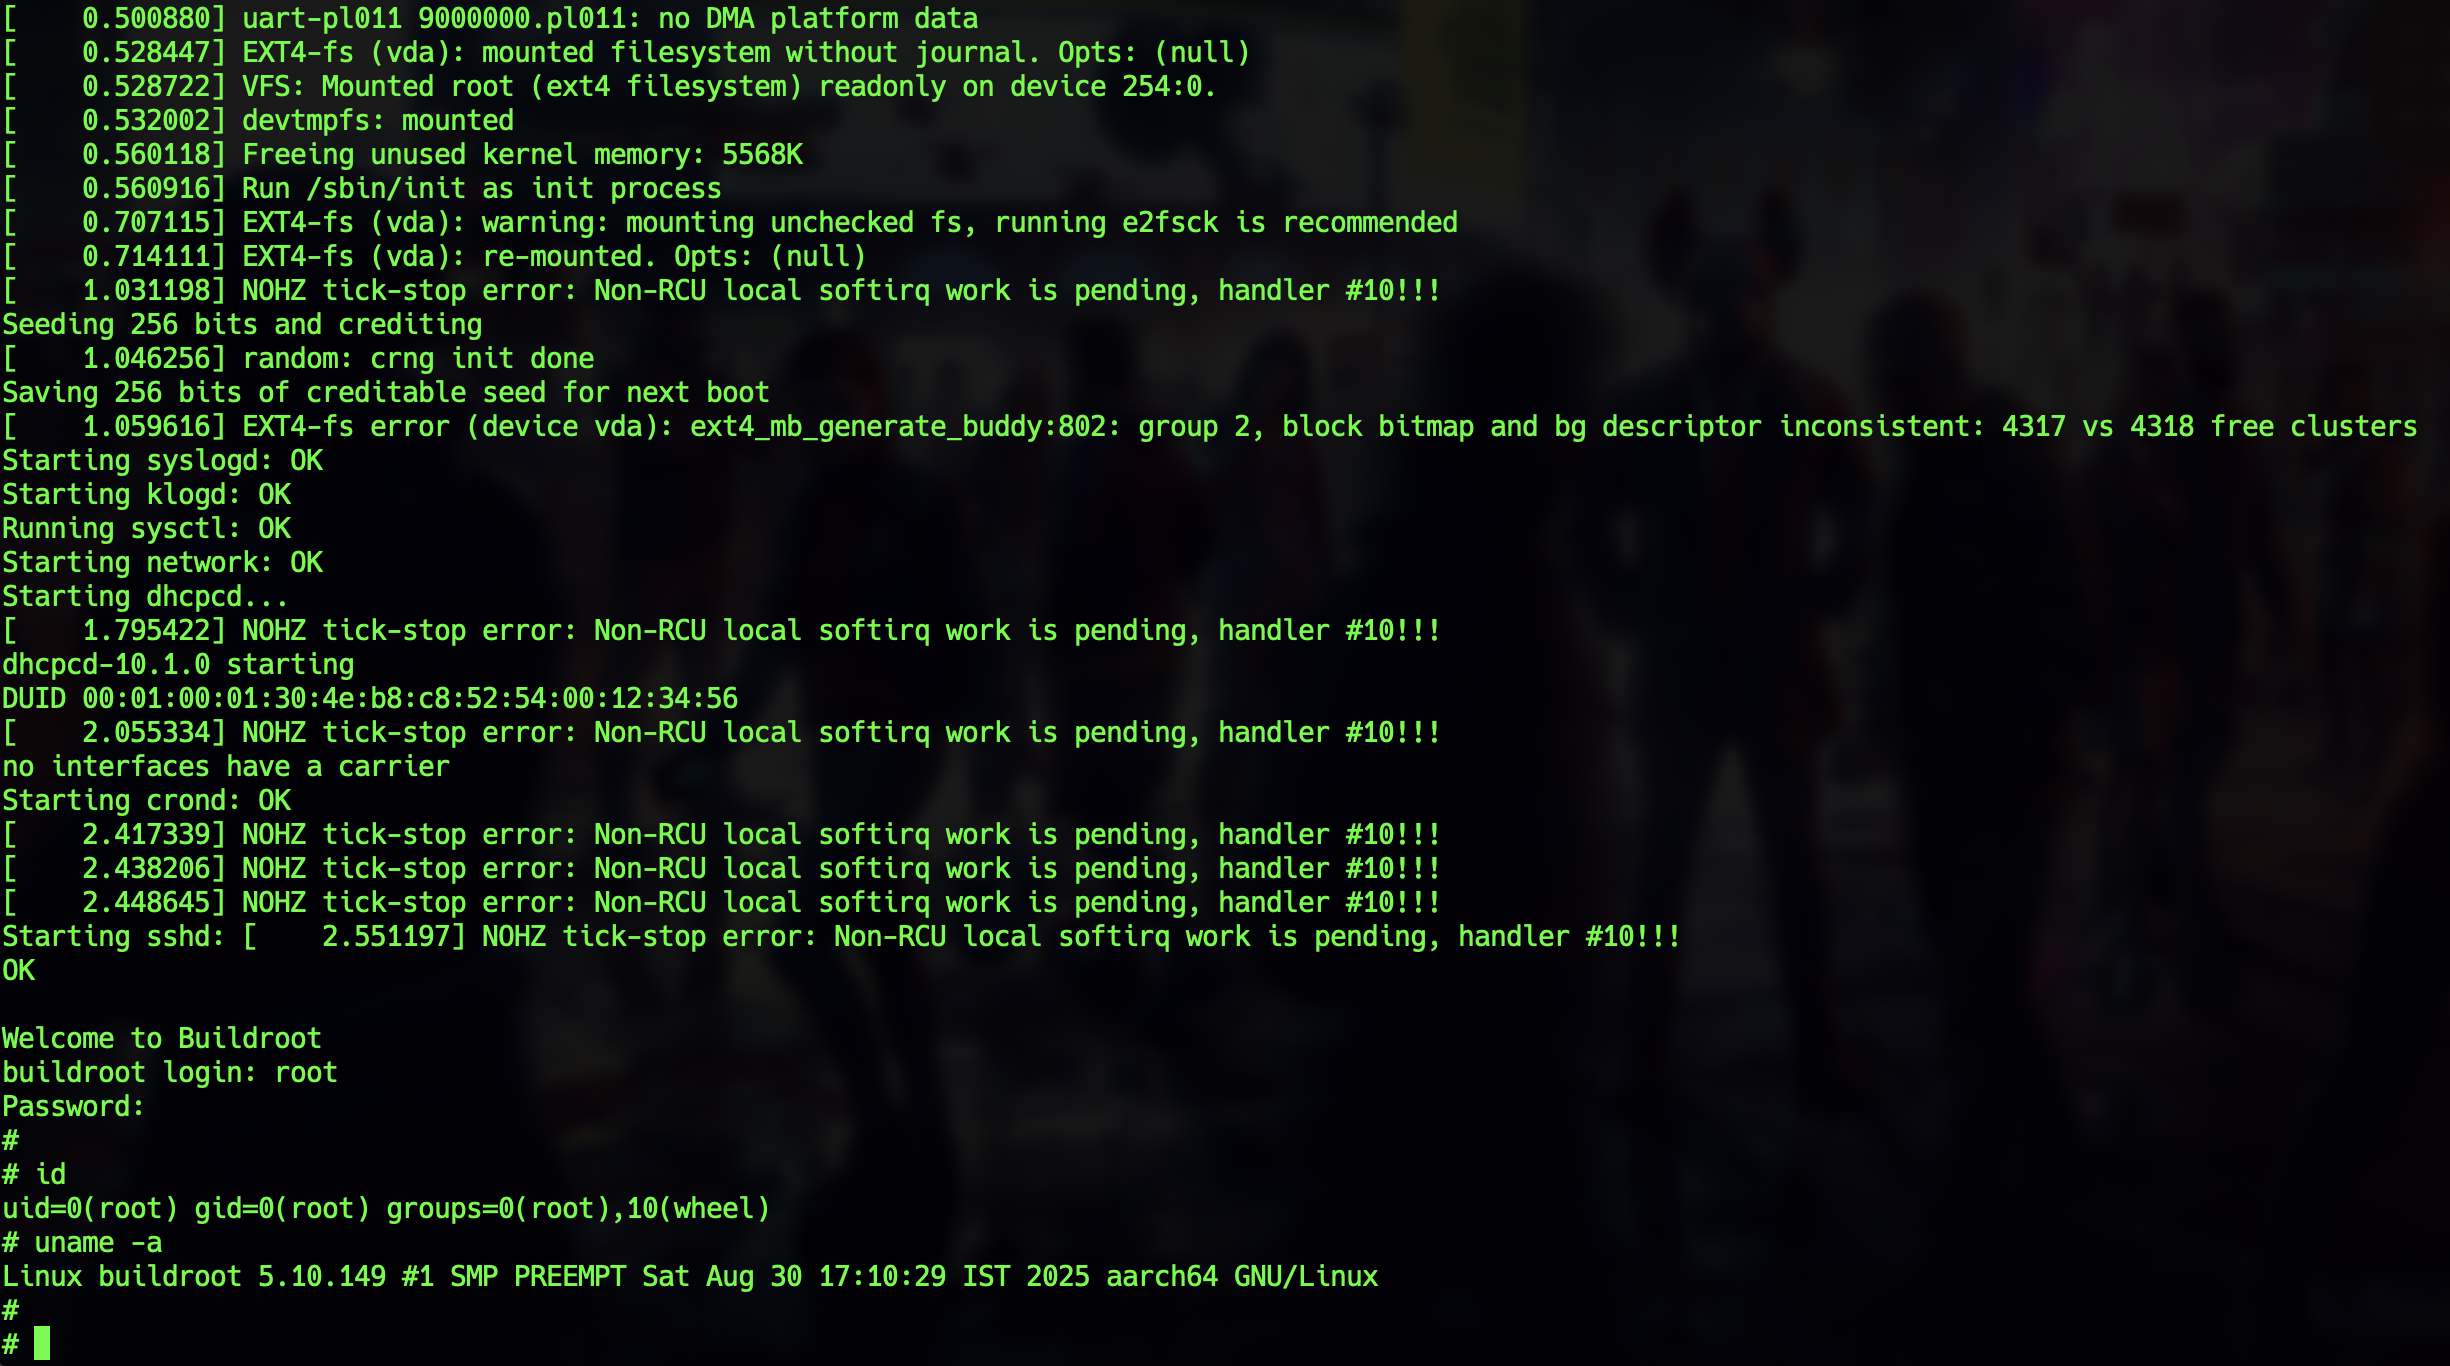
You may need to change the paths for
KERNELandROOTFSvariables in the script to match your system. To quit the QEMU session, you can doCtrl-A+X.
Getting SSH Access from Host
Before we can do ssh from the host, we need to turn on PermitRootLogin inside /etc/ssh/sshd_config in the guest -
1
2
3
4
5
# Run these commands in the QEMU instance

echo "PermitRootLogin yes" >> /etc/ssh/sshd_config
# Reboot the Android Kernel
reboot
Now, you can also do ssh into your QEMU kernel using -
1
ssh -p 13337 root@localhost
Enter the password you set during the buildroot configuration and you’ll get a root shell!
Android Kernel Driver Programming
In Android, drivers play a critical role in enabling communication with SoCs, sensors, storage, and other components that power mobile devices. Learning kernel driver programming provides insight into how Android interacts with hardware at the lowest level, and also highlights common pitfalls that can lead to security vulnerabilities.
In this section, we will cover the fundamentals of writing, compiling, and loading kernel modules for the Android kernel we previously built and emulated. We will demonstrate how to develop out-of-tree drivers using the kernel source, transfer the resulting module to the QEMU guest, and insert it into the running kernel for testing. Firstly we will create a folder called android-driver and create these 2 files -
my_driver.c
1
2
3
4
5
6
7
8
9
10
11
12
13
14
15
16
17
18
19
20
21
#include <linux/module.h>
#include <linux/init.h>
#include <linux/kernel.h>

static int __init driver_entry(void)
{
	printk(KERN_INFO "Hello, World from StreyPaws!\n");
	return 0;
}

static void __exit driver_unload(void)
{
	printk(KERN_INFO "Goodbye, World from StreyPaws!\n");
}

module_init(driver_entry);
module_exit(driver_unload);

MODULE_LICENSE("GPL");
MODULE_AUTHOR("StreyPaws");
MODULE_DESCRIPTION("android kernel driver example");
Makefile
1
2
3
4
5
6
7
8
9
10
11
12
13
14
15
16
17
# Kernel module name
obj-m := driver.o

# Path to the Android/ARM64 kernel source tree
KERNEL_SRC ?= <PATH_TO_YOUR_KERNEL_SOURCE>

# Cross-compile settings
ARCH          := arm64
CROSS_COMPILE := aarch64-linux-gnu-

# Default target: build the module
all:
	$(MAKE) -C $(KERNEL_SRC) M=$(PWD) ARCH=$(ARCH) CROSS_COMPILE=$(CROSS_COMPILE) modules

# Clean build artifacts
clean:
	$(MAKE) -C $(KERNEL_SRC) M=$(PWD) ARCH=$(ARCH) CROSS_COMPILE=$(CROSS_COMPILE) clean
Replace
PATH_TO_YOUR_KERNEL_SOURCEin theMakefilewith the path to the Android Kernel source in your system.
This is a simple Linux Kernel Module (LKM) which will prints messages in the Kernel Logs (dmesg) when loaded and unloaded from the kernel. After saving these files, fromt the android-driver we can run -
1
make
This will create a file called my_driver.ko. This is the Kernel Object file which we will be inserting in the Android kernel. Let’s transfer this file to the running QEMU guest -
1
scp -P 13337 my_driver.ko root@127.0.0.1:/root
Now, login into the guest and run the commands -
1
2
3
4
5
6
7
8
9
10
11
12
13
14
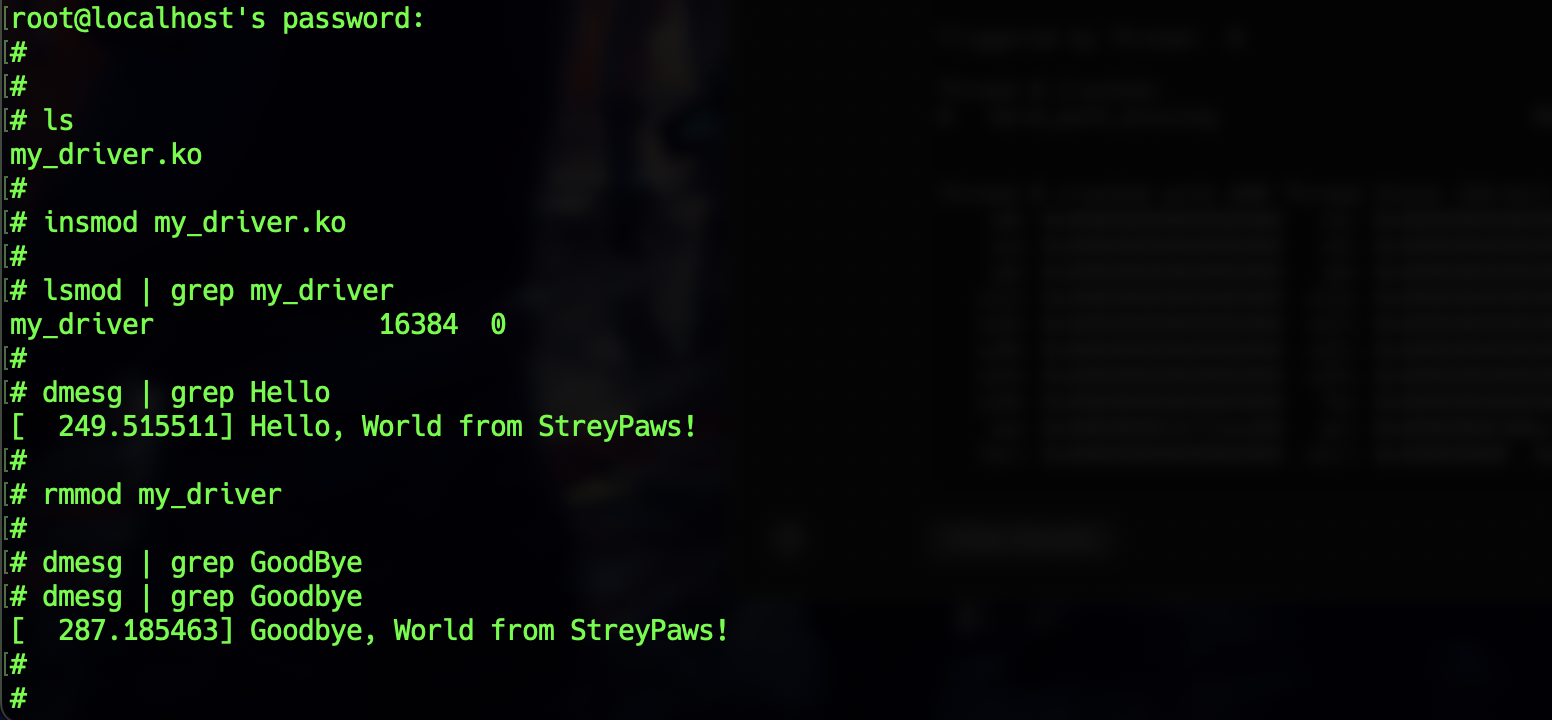
# Command to insert the LKM into the Kernel
insmod my_driver.ko
# Check if the module is loaded
lsmod | grep my_driver
# Check dmesg Logs for output
dmesg | grep Hello
# Unload the LKM from the Kernel
rmmod my_driver
# Check dmesg Logs for output
dmesg | grep Goodbye
This approach allows you to load and unload modules in the Android kernel, effectively giving you EL1 (kernel mode) access within the system. With this capability, you can develop and test different types of drivers—such as character, block, or others—and interact with them using userspace programs. Such a setup is invaluable both for experimenting with your own driver code and for security research, including Capture the Flag (CTF) challenges that involve analyzing and exploiting vulnerable kernel drivers.
Android Kernel Debugging
We’ll now see how we can enable debugging from our host into our QEMU guest. Firstly we need to install gdb-multiarch since we’ll be debugging an aarch64 guest.
1
sudo apt install gdb-multiarch
We will use the following script debug.sh to set up kernel debugging. Since the QEMU launch script includes the -s option, it automatically starts a GDB server on port 1234.
1
2
3
4
5
6
7
8
9
10
11
12
13
14
15
16
17
18
19
20
21
22
23
24
#!/bin/sh

# Check if path to kernel build directory is provided
if [ -z "$1" ]; then
    echo "Usage: $0 path/to/your-android-kernel-build"
    exit 1
fi

VMLINUX="$1/vmlinux"

# Check if vmlinux file exists
if [ ! -f "$VMLINUX" ]; then
    echo "Error: vmlinux not found at $VMLINUX"
    exit 1
fi

# Launch GDB with appropriate options
gdb-multiarch "$VMLINUX" \
    -ex "set confirm off" \
    -ex "set architecture aarch64" \
    -ex "set pagination off" \
    -ex "target remote :1234" \
    -ex "break start_kernel" \
    -ex "continue"
This command launches GDB with multi-architecture support to debug the Android ARM64 kernel with symbols ($VMLINUX). The -ex options are startup commands: set confirm off disables confirmation prompts, set architecture aarch64 ensures GDB interprets symbols as ARM64, and set pagination off stops pausing output. The debugger then connects to QEMU’s GDB server at port 1234 using (target remote :1234), sets a breakpoint at start_kernel (the kernel’s main entry point), and immediately continues execution until that point is reached.
On one terminal, run the following command -
1
./run.sh debug
This will run the kernel with the -s option so that we can connect to it using gdb-multiarch. On another terminal, run -
1
2
# Replace the path with your android kernel source path
./debug.sh /path/to/android/kernel/source
It will run the script above and attach gdb to the QEMU guest instance. You’ll seein the screenshot below that gdb has attached and is in continue state. Using Ctrl+C you can stop execution and start your debugging steps.
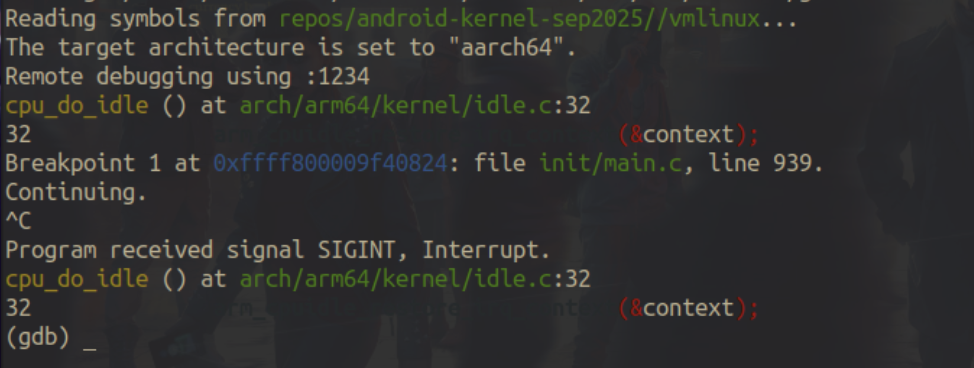
Another option for debugging is to use -S together with -s in the QEMU arguments. The -S freezes the virtual CPU at startup. This means QEMU halts execution immediately and waits until a debugger (like GDB) attaches and issues continue. This is especially useful when you need to debug from the very first kernel instruction, such as analyzing early boot code, inspecting hardware initialization, or catching bugs that happen before start_kernel is reached.
To do this, on one terminal run -
1
./run.sh debug freeze
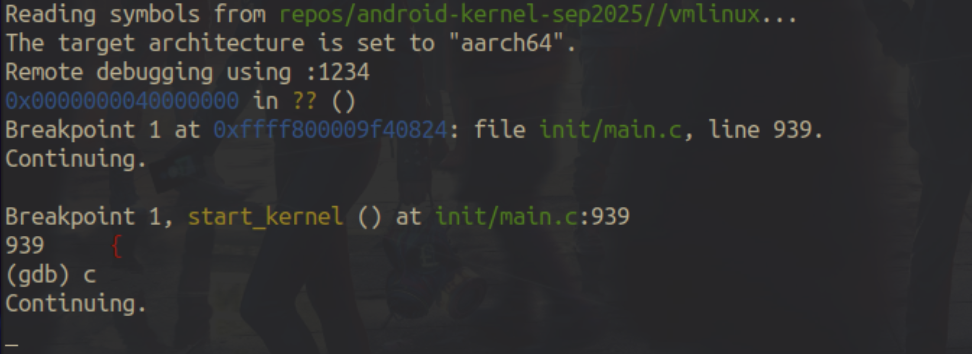
You see as in screenshot below, the QEMU instance freezes on startup.

and on another terminal run -
1
2
# Replace the path with your android kernel source path
./debug.sh /path/to/android/kernel/source
Which will attach the debugger to the freezed guest, and directly drop in gdb prompt, so you can start debugging directly.
In this way we can enable debugging on Android Kernel running in an QEMU guest instance.
Conclusion
Studying the Android kernel through compilation, emulation, and debugging provides a structured way to understand the core of the operating system that powers billions of devices. By setting up a reproducible environment with QEMU and Buildroot, we gain a safe and flexible platform for experimentation.
This not only allows us to explore kernel internals and driver development but also equips us to reproduce and analyze real-world vulnerabilities. Ultimately, this journey bridges theory and practice, preparing us to contribute meaningfully to Android kernel security and development.
Credits
Hey There! If you’ve come across any bugs or have ideas for improvements, feel free to reach out to me on X! If your suggestion proves helpful and gets implemented, I’ll gladly credit you in this dedicated Credits section. Thanks for reading!